Creality Ender 3 V3 SE Review
Budget · generally less than the A1 mini
Our verdict
I see it as a useful budget printer for everyday PLA projects, occasional PETG and firm flexible filament. Choose it for affordable printing space if you are willing to watch first layers, make small corrections and carry files on an SD card.

Best atAffordable organizers, terrain and small practical parts with room to learn print settings.
Less suited toWireless convenience, minimal adjustment or projects centered on ABS, ASA and nylon.
The Key Specs
| Print area | 220 × 220 × 250 mmFits many organizers and small housings; supports and borders need extra room. |
|---|---|
| Leveling | CR Touch mesh and automatic Z-offsetWatch the first layer: the starting nozzle height can still need a small correction. |
| Material fit | PLA, PETG and TPU 95AStart with PLA; PETG and flexible filament need their own settings. |
| Filament feed | Directly above the nozzleHelps control flexible filament, but much softer TPU is not equally straightforward. |
| File transfer | SD card; no factory Wi-FiEach revised file means another trip to the printer. |
| Filament detection | No stock runout sensorCheck that the spool has enough filament before a long job. |
Budget beyond the printer. Allow for filament beyond the small included sample, plate-cleaning and lubrication supplies, and drying equipment if your filament maker calls for it. A replacement build surface is optional; ordinary PLA projects do not require hotend, screen or cooling upgrades.
Also consider: Bambu Lab A1 mini. Generally costs more, but adds wireless file transfer, a touchscreen, filament-runout detection and more automatic adjustments. Its 180 × 180 × 180 mm print area is smaller.
More Specs And Ownership Details
| Model choice | The SE is a distinct factory model. The KE and plain V3 need different slicer profiles. |
|---|---|
| Temperature limits | Nozzle up to 260°C; bed up to 100°C. The SE has no enclosure. |
| Advertised speed | 180 mm/s typical, 250 mm/s maximum; 2,500 mm/s² acceleration. Finished print times depend on the model and settings. |
| Build surface | Flexible PC-coated steel sheet. Let it cool before removing and gently flexing it. |
| Software / controls | Creality Print and Cura include SE profiles. The screen uses a rotary knob and is not touch-sensitive. |
| Workspace / care | Allow room for the moving bed, cable and overhead spool. Use a ventilated space; clean the plate, check belts and follow the manual's lubrication instructions. |
I’d consider the Creality Ender 3 V3 SE if you want an inexpensive first printer for desk organizers, tabletop terrain, small decorations, and ordinary plastic parts—and you’re willing to learn a few settings. Reported print tests show that it can produce good results, but getting it assembled is easier than getting every new file to print well.
Automatic leveling helps, yet you may still need to adjust the nozzle’s starting height to get the first layer right. You’ll also carry files over on an SD card and check that there’s enough filament—the plastic fed into the printer—for each job. I’d consider the SE for its useful printing space and low cost. For smaller projects, the Bambu Lab A1 mini deserves a close look before you buy.
Getting The SE Ready For Your First Print
You don’t have to build the SE from a box of loose mechanical parts. You attach the upright frame to the base, mount the screen and spool holder, and connect the labeled wiring. Tools are included. Allow yourself time to follow the manual carefully, especially when securing the wide cable that runs to the print head.
Before connecting power, check the voltage selector. The manual specifies the 115V position for a 100–120V supply, which covers a normal US household outlet. Don’t assume it arrived in that position.
Automatic calibration helps the nozzle stay at the right distance from the printing surface, or bed. The CR Touch probe measures height differences across the bed so the printer can compensate for them as the nozzle moves. Separately, a pressure-sensitive sensor helps set the Z-offset: the nozzle’s starting height above the surface. Even with leveling done, that starting height needs to be right for the first layer to stick properly.
The automatic height measurement can still need correction. In one reported hands-on test, the nozzle started slightly too close and needed an adjustment of about 0.08mm. That isn’t a setting to copy; it shows how small an adjustment can affect the first layer.
Watch that first layer. Plastic should stick and form an even surface. If the nozzle is too high, the lines may not stick; too low, and it can restrict the plastic flow or scrape the plate. Use the screen’s Z-offset setting to raise a nozzle that’s too low or lower one that’s too high, making small corrections.
You won’t find the usual bed-leveling knobs to turn by hand. The screws for tightening the movement belts do a different job; they don’t set the nozzle height.
Aim for a successful small print before trying a file you prepare yourself. A supplied sample already has its print settings chosen.
With your own model, you’ll choose the material, speed, and which side should face down. You’ll do this in a slicer, a computer program that turns a model into the printer’s movement instructions. The SE makes assembly and calibration easier, but you still need to learn how to prepare files.
What The SE’s Print Results Mean For Your Projects
The SE is a reasonable choice for terrain walls, pencil cups, and prototype enclosures if you can accept some surface flaws. Small decorative models are possible, too, provided you’re willing to clean up the prints and adjust settings.
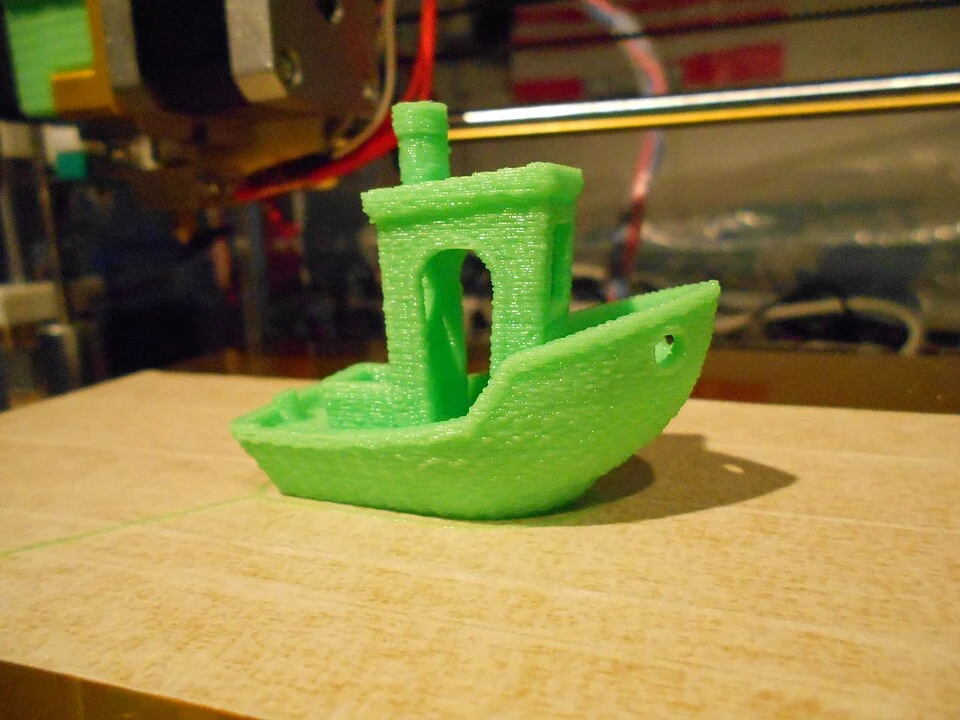
One reported Benchy—a small boat used to test printers—finished in 41 minutes using PLA, a plastic suited to ordinary indoor projects. The test used gray Inland PLA, 0.25mm layers, 0.5mm line width, two walls, three top and bottom layers, and 10% grid infill, a sparse grid inside the boat. The version of the printer’s built-in software, or firmware, wasn’t reported.
The tester reported mostly smooth layers, with roughness at the bow but no shifted layers or repeated ripples from vibration. That’s a useful result from a factory SE, not a promise about your model’s completion time.
Creality advertises a maximum of 250mm/s and a typical speed of 180mm/s. Those numbers describe movement, not how quickly a finished object appears. The printer must slow for corners, small details, and other parts of the job. Its specified acceleration of 2,500mm/s² also limits how quickly it reaches the selected speed. Increasing the speed setting won’t shorten every print by the same proportion.
Thinner layers make the individual layers less visible, but take longer to print and don’t remove every defect. Another reported test used 0.1mm layers on a small dragon and needed adjustments to stop fine plastic threads forming between its features. This is called stringing.
The tester adjusted temperature and retraction, which briefly pulls filament back to reduce leakage from the nozzle. The filament and firmware version weren’t reported, so this isn’t a recipe to copy. Choosing thin layers alone wasn’t enough to get the result.
Shapes that extend outward without a layer directly beneath them, called overhangs, can be harder to print cleanly. One reported test found that turning an overhang toward the airflow that cools the print improved its underside. Rotating the model or adding printed supports that hold up these areas and are removed afterward can matter more than increasing speed.
Parts that fit together need their own check. In one measurement test, a feature meant to be 20mm measured 20.09mm in one direction. Another meant to be 5mm measured 4.84mm in the other direction. The material and settings weren’t fully documented, so these results can’t tell you how much space to leave between every pair of parts.
Before printing a large box and lid, print a small section of their joint. Good-looking walls don’t guarantee that two parts will slide together.
Which Materials And Part Sizes Suit The SE
The SE’s build space is 220 × 220 × 250mm, or about 8.7 × 8.7 × 9.8 inches. That’s enough for many organizers, terrain pieces, and small housings. Check the model in the slicer before buying: supports or an added border around the base can need extra room. If a prop is too big to print in one piece, you’ll need to print smaller sections and put them together.
Creality lists PLA, PETG, and TPU 95A as supported materials. Start with PLA for ordinary indoor projects.
PETG offers better heat resistance than PLA and is useful for tougher practical parts. Expect to adjust its settings rather than reuse your PLA setup. TPU is flexible plastic; 95A identifies a relatively firm grade.
A reported PETG Totoro figure used ProtoPasta filament at 120mm/s and 0.2mm layers, finishing in 51 minutes with the model reduced to half its original size. It had fine plastic threads around the ears.
In a reported TPU rack-cap test, the printer ran at 40mm/s and 0.2mm layers. The caps were printed separately to avoid threads between them. Each layer starts and stops at a seam; placing those seams randomly left bumps around the print. The TPU brand and hardness weren’t reported.
The SE feeds filament directly above the nozzle, which helps control flexible material, but don’t assume much softer TPU will be equally straightforward.
The stock plate is flexible steel with a polycarbonate, or PC, coating. It can hold prints very firmly. Let it cool, then remove and gently flex the sheet. Don’t force a stubborn part off while it’s hot. A replacement surface is optional, not a requirement to begin.
I’d pass if ABS, ASA, or nylon is your main goal. These plastics can shrink enough as they cool to pull a print’s corners off the bed. An enclosure keeps the air around the print warmer to reduce that warping; the SE has none.
Adding an enclosure doesn’t raise the SE’s 260°C nozzle limit or 100°C bed limit. The filament’s heating requirements still need to fit the printer, and these materials aren’t on Creality’s supported list for the SE.
Using The SE Day To Day
You don’t need to create all the slicer’s printer settings from scratch. Creality Print and Cura include an Ender-3 V3 SE profile, a saved set of settings for this printer. Select the exact SE model and nozzle size; the similarly named KE and plain V3 use different settings.
Creality Print offers Windows, macOS, and Linux downloads. Download it from its official source instead of relying on the older copy supplied with the printer.
To print your own file, prepare the model in the slicer and preview the layers. Export the result as a G-code file—the instructions the printer follows—to an SD card, then put the card in the printer and select the file with the screen’s rotary knob. The screen isn’t touch-sensitive, and the factory SE has no Wi-Fi. If your computer and printer sit in different rooms, each revised file means another trip with the card.

The menus help load and unload filament, but the stock SE has no filament-runout sensor to pause automatically when a spool empties. Check that you have enough before a long job, especially when using the last of a roll.
Give the SE a stable surface, space in front and behind for the moving bed and cable, and room above for the spool. Published dimensions don’t describe all the room needed while printing. It’s a poor choice for a shelf that only just fits the printer when it’s stationary.
Expect to hear the fans and movement. Noise impressions vary, so you may not find it quiet beside your desk.
Filament printing can also release particles and gases, including when you use PLA. Use a well-ventilated space away from where you spend long periods sitting.
Routine care includes cleaning the plate, checking belt tension, and following the manual’s lubrication instructions. Successful review prints don’t tell you how often the printer will need repairs over the years. Expect ordinary maintenance; the evidence doesn’t establish either constant trouble or years without attention.
What You Gain By Spending More Than The SE Costs
When comparing costs, include filament and basic care supplies. The SE’s included filament sample won’t take you far. You don’t need to upgrade the hotend (the assembly that melts filament), screen, or cooling system to begin making ordinary PLA objects.
Filament can absorb moisture from the air, leading to rough surfaces, extra stringing, or weaker bonds between layers. Drying removes that moisture; TPU tends to need it more often than PLA.
Check the filament maker’s drying instructions before buying a spool, and budget for suitable equipment if it calls for drying before use. Stringing alone doesn’t prove the filament is damp: temperature and retraction settings can also cause it.
The A1 mini is the closest alternative I’d consider for easier everyday use. It generally costs more, but adds wireless file transfer, a touchscreen, a sensor that detects when filament runs out, and more automatic adjustments. Reported testing found it easy to set up and its Bambu Studio software easy to use.
The tradeoff is a smaller 180 × 180 × 180mm build space. You may need to split a model that fits the SE into smaller pieces, then put them together after printing.
Compare the printers without optional accessories: the A1 mini doesn’t require a multicolor bundle for those conveniences. I’d pay more for it if your projects fit and you dislike adjusting settings. It still requires file preparation and maintenance, and it isn’t the alternative I’d choose for ABS, ASA, or nylon. For wireless file transfer, plan on using Bambu’s software, Bambu Studio or Bambu Handy.
Within Creality’s range, the Ender-3 V3 KE adds Wi-Fi, a touchscreen, and filament detection while keeping a similar build area. It’s a different factory model, not an SE with a software setting unlocked. It’s worth considering if you need more room than the mini offers, although Creality’s US store currently marks it sold out. Don’t plan around being able to order it immediately.
The newer Ender-3 V4 Combo is also listed in Creality’s US range. The SE isn’t the newest Ender, but that alone doesn’t make it worse value for basic single-color printing.
Be cautious about buying the SE with a long upgrade list already planned. Creality has changed the printer’s main circuit board, affecting compatibility with its Sonic Pad add-on. Older instructions for that upgrade may not apply to the board you receive. If you want wireless control and more automatic adjustments from day one, it’s simpler to buy a printer that already has them.
Who The SE Makes Sense For
I’d recommend the SE when you want affordable printing space for everyday PLA projects, occasional PETG, or firm flexible filament—and you don’t mind watching first layers and making small corrections. It’s especially useful when your parts won’t fit on a smaller printer and your budget is tight.
It’s also worth considering as a replacement for an older entry-level printer that lacks automatic leveling or the SE’s direct filament feed above the nozzle. But if your existing printer already prints your parts well, the SE doesn’t automatically give you better-looking results. Replace it to solve a specific frustration, such as setup effort, rather than to get a newer version of the same name.
I’d pass if you want wireless convenience immediately, mainly want to print ABS, ASA, or nylon, or have no patience for learning why a print failed. For smaller projects and less manual adjustment, I’d favor the A1 mini when the extra cost fits your budget.
The SE remains relevant as a basic, capable option, with a current US listing and software profiles. It’s good value when the printer as supplied meets your needs.


